Features
Member conditions
Elements
Content Timeline
Easily build animated vertical timelines. Supports use with repeaters to feature dynamic data from posts or pages or ACF repeaters.
Setting up your timeline and adding dynamic data
2. Adding optional scroll animations
Overview
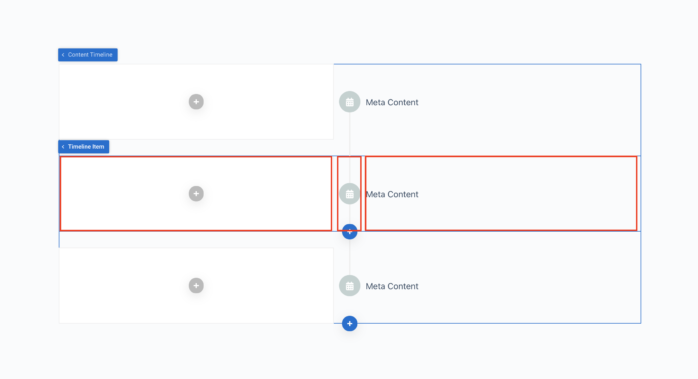
The timeline consists of two main elements, the ‘content timeline’ itself and the child elements which are the timeline items. Inside of each timeline item is three parts – The content area, the marker and the meta content (see image below).

To add content to the content area (on the left in the image above) you can simply add new elements using the add element plus icon. The meta content is populated by the settings inside of the content item, which supports dynamic data.
Each timeline items can be added in manually if you’re not needing to use any dynamic data, or can be set as a repeater consumer meaning they will be duplicated for each post (or repeater row) that exists.
Content Timeline element
From the parent content timeline element we have the overall behaviour controls, the alignment settings, the scroll animation settings and the ability to style the entire timeline from the styling tab.
Alignments – Each timeline item has three parts – the content, the marker and the meta content. Depending on which type of layout you’re building, you may want the content on the left, on the right, or alternating. This can be changed across device widths.
Size & Spacing – Here you can adjust the widths of the content, the meta content and the timeline line. (Note that if alternating, make sure the widths of both the content and meta content is set to 50% to align the timeline line.)
Scroll Animation – if enabled the styles will be changed on the timeline as the user scroll past. Set the offset to change the point at which the styles are added, 0% is at the top of the viewport, 100% is at the bottom.
Colors – For convenience only, the colours of the line, marker and icons can be changed for both the default styles and the active styles. This can also be done inside the styling tab where there are many more CSS settings.
Styling Tab
Frome the styling tab, all the inner elements can be completely customised to fit your design. Those labelled with (active) means the styles that will be applied only when that part of the timeline is scrolled to by the user. We recommend sticking to simple CSS rules such as colours, backgrounds, transforms and opacity for smooth animations. Height/width/padding/margin etc is not recommended.
Timeline Item Element
The general settings for the timeline item are based around changing the output of the element rather than styling.
Icon – Choose the icon from the standard icon picker. The size / colour can either be chnaged inside the styling tab or if you want them to all be the same for each item, it’s best to do all the styling from the content timeline parent settings.
Meta Content – Here’s a text field to add some simple meta content which will appear at the opposite side of the timeline to the content area. This accepts dynamic data so is ideal for dates, or using data from custom fields.
Preview Active Styles – For performance reasons, the scroll effects aren’t active inside of the builder, however you can enable this setting to manually add the classes so the results of any active styles you’ve added will be visible inside of the builder. And then disable to return to the original styles.